Saturday, November 2, 2013

Started Vertical Stabilizer

I love weekends. They provide a chance to rest, relax, sleep in, forget about work, catch up on cleaning my house, and most importantly... BUILD! I really like the uninterrupted, productive work sessions I'm able to have during my weekends. Tonight was no exception. I started work on my vertical stabilizer. A lot of builders will start their projects by building the VS... and after working on it for a while, I can see why... it is much simpler than the HS. The whole assembly is made up of only eleven parts. I had a lot of fun working on this tonight.

To begin I had to flute the ribs, then cleco the skeleton together and match drill it.


The rear VS spar, stiffener and hinge brackets clecoed together

The whole VS skeleton clecoed together

After match drilling the skeleton, I clecoed the skin on it and match drilled the skin. Pretty simple!


The VS all clecoed together... looks awesome!

I then was able to begin deburring some of the parts before deciding to call it a night. So far, so good. I think I could have the VS ready for primer by the end of the weekend... if I don't make any mistakes like I've made on the HS!

It still pumps me up to see these parts coming together. It's also still somewhat surreal to think I'm actually building an airplane. Every time I hear a plane fly over or see one on approach to the runway near my house, I feel a little boost in my motivation to keep things moving so I can get this thing into the air and realize my dream. Still a long way to go, but the progress I've made so far is exciting!


Friday, November 1, 2013

More Dimpling... and Another Mistake

I spent last night dimpling the rest of the HS, including the understructure. The left side skin was dimpled using the DRDT-2 dimpler.


The left skin all dimpled

The understructure was dimpled using my pneumatic squeezer. This tool is awesome... it's essentially an air-actuated piston that squeezes either rivets or, when a dimple die is inserted in the tool, creates dimples. It makes quick work of making dimples... and as I found out, sometimes too quickly. Unfortunately, the squeezer got away from me a little bit and I ended up missing one of the holes while dimpling. Damn.


The hole that was missed with the squeezer

A rivet placed in the hole so you can see how far off the accidental dimple was

A shot of the underside, showing the damage

I've read on the Van's Air Force forums that this is a fairly common mistake that builders make, but most make it while dimpling skins. In almost every case, the builders were told that it wasn't a critical mistake and the builder could build on with a pretty simple fix. My mistake was made in the forward spar top flange though, so I didn't find any solutions to my particular mistake. So I contacted Van's builder support to see if they had a suggestion for me. I got an answer back pretty quickly... and as I figured, this hole is considered a critical joint because it is where a rib will attach, meaning it will see more stress than a hole where just the skin attaches. Because of the uncertainty of how much strength in that joint would be lost because of this mistake, the engineers recommended I replace the part. Such is my luck! So I've ordered the replacement part (luckily it was only $20) and will rework it when I receive it in the next few days.

This mistake was particularly frustrating because of the significant progress I've been making lately. I was hoping it'd be a quick fix, which would allow me to stick to my plan for this weekend. My plan was to prime all of the parts, which would've allowed me to get to pounding some rivets in the next week, but that will all have to wait. I'll chalk this up as a learning experience and make sure I'm taking my time to carefully dimple my parts with the pneumatic squeezer from now on.

So this weekend, I now plan to begin working on the vertical stabilizer, drilling and match drilling those parts. That way I won't be letting this mistake completely stop my progress. If I make some good progress on the VS, I may put myself in a situation that will allow me to prime both the HS and VS in one session. I'll keep you updated!


All of the spars dimpled... one of which will be replaced


Sunday, October 27, 2013

Deburring and Dimpling HS

This weekend was pretty productive. I was able to finish deburring all of the HS parts and moved on to dimpling the skins. So far I have the right HS skin dimpled. I've got the left skin and the understructure left to dimple. When I'm finished with that, the HS will be ready for the priming process. Looking forward to getting to the point of pounding some rivets!


After deburring, I removed strips of vinyl where the rivets will go. This will protect the rest of the skin from scratches.

This is the inside of the skin, with the vinyl removed and deburring done. It hurt me inside a little bit to go scratching up these beautiful skins, but it had to be done. Deburring of the holes on the interior of the skin was just done with 400-grit sandpaper. 

Here you can see both the left and right HS skins next to each other. Gives some perspective of the final size of the tail.

Dimpling the skins with the DRDT-2 dimpler. This thing is awesome and pretty easy to use. A second set of hands would definitely be helpful though!

A close-up of the dimples. They came out very nice and crisp.

A close-up of the back side of the dimples

The bottom side of the right HS skin all dimpled


Tuesday, October 22, 2013

Deburring HS Skeleton

I spent a couple hours last night deburring the edges of the horizontal stabilizer skeleton. "Deburring" means removing sharp edges or chips on the edges of metal parts, including the holes I've drilled. These sharp points and chips are a place where stress can concentrate and eventually cause cracks in the metal. By removing those sharp points and chips, the stress spreads evenly across the whole part, reducing the chances of cracking. I've hear deburring is one of the most time-consuming tasks in building an RV, and I completely believe that at this point. ha! It's going to take quite a while to prep the skeleton and skins, making sure I've knocked down any burrs. But it's an important step in making a strong, quality airplane and that's what I'm going for. Deburring isn't all that exciting, so I didn't get any pictures of the work last night. I've got a couple more nights of deburring left before I can get on to dimpling the parts and then priming them. Hopefully will get a couple free night in the next few days to do that though...

Sunday, October 20, 2013

Back At It

Well it's been a long month since I last got anything really significant done on my project. Work has been super busy lately. At the end of the fiscal year, my squadron gets really busy trying to compete for construction project funding that gets released in the last few days of the FY. And the pace at work didn't really slow down after 30 September either. We have a big inspection coming up at the end of October so that's kept me really busy as well. And then on top of that, I've had my Master's degree classes I've been trying to keep up with. So overall, just haven't had time to put much work into the airplane.

OK, OK... enough with the excuses. I did work a little bit on the project a few weeks ago to correct my mistake on the forward spar reinforcing angle. That fix went pretty quickly, so I don't have any pictures of it. Anyway, I got back to really working on the project yesterday, completing some prep work on the left-side horizontal stabilizer by match drilling and match drilling the skin and skeleton. This all went pretty smoothly and got me really excited to see the skin clecoed to the skeleton... awesome!

Today I was able to work through all of the drilling and match drilling on the right-side horizontal stabilizer. This work included some fluting of the ribs to ensure they were completely straight (something that took me some time to figure out). As with the left side, everything went pretty well. I had some struggles getting the skin to line up with the skeleton just right, but figured it out pretty quickly.


Fluting the ribs to straighten them

Left-side HS skeleton clecoed together

Using a lot of clamps to hold things in place

A close up of a little blood. Now I can say I've bled and sweated for this project... no tears yet. Those skins are sharp though!

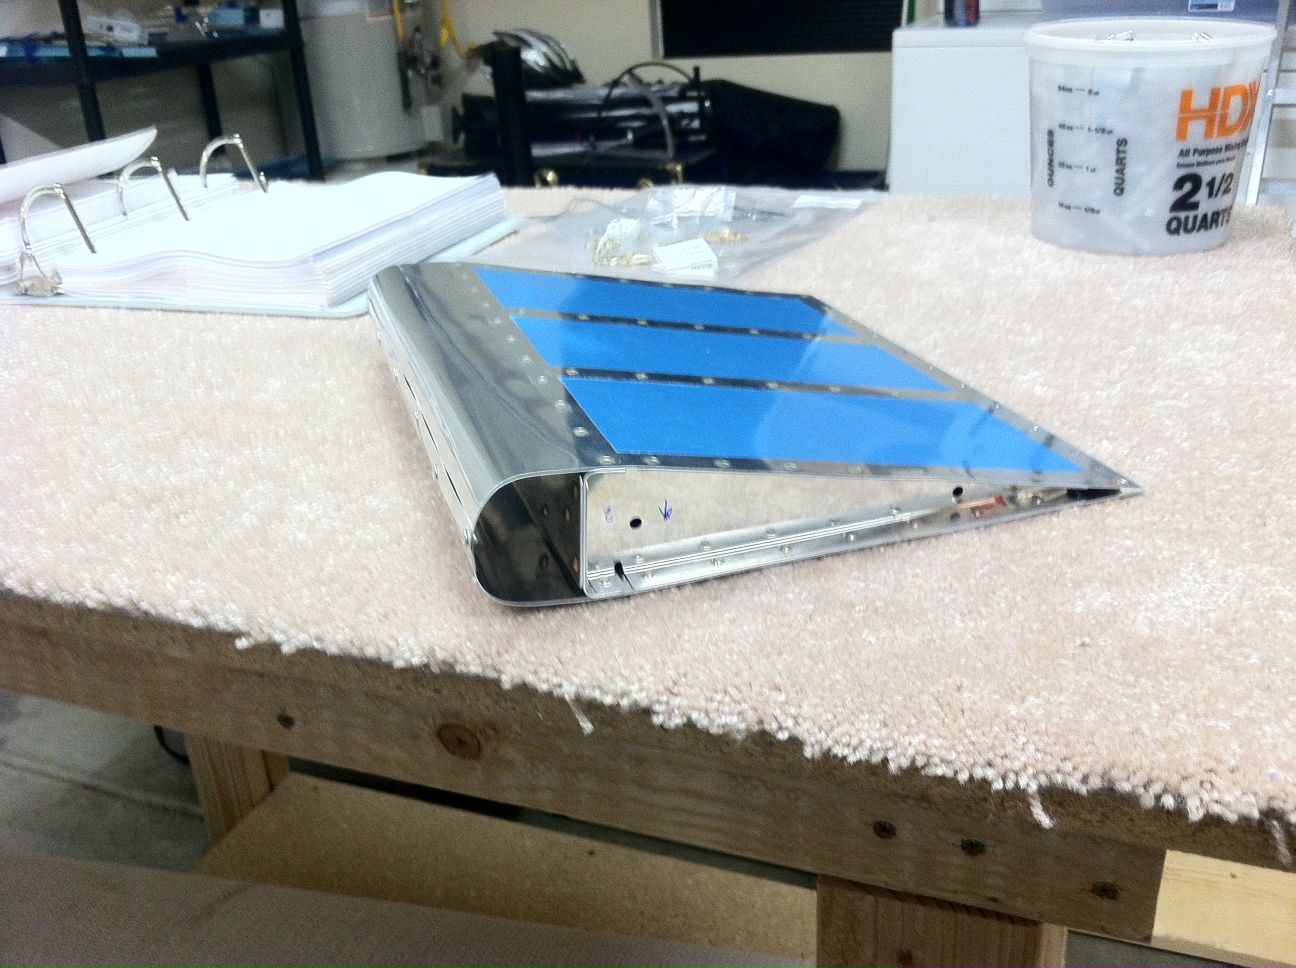
Left-side HS all drilled and match drilled

Right-side HS drilled and match-drilled

Proof that I am actually doing this work. ha!


It felt really good to get back to work on the project... and to make some significant progress to boot! I've disassembled everything at this point and I will now deburr all of the edges and holes, dimple the skins and understructure, and then prep the parts for primer. It'll likely be at least a week or so before I actually get to the primer, but I'm going to try to keep plugging away. We have the inspection I mentioned coming up soon and I'll be working some really long hours on those days, so hopefully I can get the parts primed before that begins.

On a side note, after almost nine months of not flying, I got back up in the air last week. My medical expired while I was deployed, so I got that taken care of and then joined the base's aero club. After a Biennial Flight Review, I was cleared to fly again! Got a chance to have some fun flying around the local area with my buddy Scott this past weekend. It felt great to be back up there! 

Scott and me buzzing around the local area


Monday, September 9, 2013

My First Oops

Damn. I was wondering when it would happen, but it happened sooner than I wished it had. Tonight I made my first mistake. I started in on drilling one of the ribs for the empennage tonight. Drilling the forward flange of the HS-405 rib is a bit of a trick for a lot of builders as the plans don't show a ton of detail and can be a bit confusing. After doing some searching online, I found another builder's log which details how he drilled the rib and it looked like a pretty solid plan to me. So I started out using his advice and was cruising along, thinking I was doing really well. Until I got ready to drill the second hole. Then I realized my mistake.


Everything clamped and clecoed in place, ready to be drilled

First hole drilled

It's tough to see in my first picture, but I had clamped the reinforcing angle (HS-714) upside down before I drilled. Unfortunately, I didn't catch this until after I had it drilled. This wouldn't have been too big of a deal had it been the bottom angle, as these holes drilled in the bottom angle are centered vertically on it. On the top angle, though, they are not centered vertically so this hole I drilled will not work on the opposite side if I were just to flip it over. I'm considering calling Van's builder support tomorrow to see what they say, but I'm nearly certain I'll have to buy a new angle. I measured where the new hole would be if I arranged it properly and drilled again, but the two holes (the correct one and the oops) would be very close, and I doubt if this would provide enough support to keep the rivet from pulling through to the oops hole. I will likely have to buy a new one and start over. Luckily this is a cheap and fairly small piece so shipping shouldn't be too much. If I keep this pace up though, this project is going to cost me A LOT.


The hole my index finger is pointing to needs to be offset to the opposite side of the angle.

I've learned some good lessons from this mistake, but it is still very frustrating that I made it. It was just a stupid mistake that I attribute to rushing to get too much done tonight. I can tell doing things slowly and deliberately is going to be a challenge for me on work nights. I get up at about 5 or 5:30am every morning, so I like to try to be in bed by 9pm or so. By the time I make the 40 minute drive home, get changed, eat some food and get started, it's already almost 7pm. Up to this point, this has left me feeling rushed to get a significant amount of work done. It really comes down to expectation management though. I just need to convince myself that I likely won't make much significant progress during the week. And I have to learn to be OK with that. As I said earlier in the log, my goal is just to build my airplane. Nowhere in that goal is there a timeline. So from now on, I will work really hard at slowing myself down and double- and triple-checking my work. As I've said before, as long as I'm doing SOMETHING almost every night, I'll be happy. Now I just have to act that way. I know I will still make mistakes, but I want to minimize them.

So, tonight was a lesson-learning night. I'm sure it won't be my last of those.


Rib-Straightening Tool

Today I had some school work to take care of so I didn't get much done on my project. I know that I need to get my Master's degree finished up in the next couple years, so I am going to make sure I dedicate enough time to that. I did, however, take some time to build a rib-straightening tool. I'd seen this on Van's Air Force and after trying to straighten a few ribs by hand, I decided it would be worth my time to build one of these now. The flanges of the ribs come out of the manufacturing process being a bit off from the 90 degree angle to the web which they have to be. So it's up to the builder to bend these flanges to the 90 degree angle. This tool makes doing that very quick, easy and accurate. I used some hard wood and cut an 11 degree angle in the wood, as suggested by some other builders on the Van's Air Force forums. This allows me to straighten the flange while still allowing for some spring-back that happens in the metal.


Side view of the rib-straightening tool

Another view of the tool

I was pretty happy with how the tool came out, though there are a couple improvements I plan to make to it at some point in the future. I misdrilled one of the holes for the bolt that attaches the steel to the handle, so the handle is offset a bit. No biggy for now... I used it to straighten all of my empennage ribs after I finished it and they came out great.

Forward Spar Work

I set my first rivet! I had to rivet the elevator hinge bracket around the elevator bearing with six rivets squeezed with my pneumatic squeezer. This was fairly simple and turned out looking pretty good. 


First rivet of thousands!

Front side of the bracket all riveted

A view of the back side

After that, I worked at shaping the reinforcement angles that will attached to the forward spar. I had to round off the ends and then bend them 6 degrees, according to the plans. This was pretty simple and they turned out pretty well.


Angles shaped

Angles bent
Next, I started work on the front spar. The front spar comes in two pieces. These were designed for use on the RV-8 and have to be trimmed down for use on the RV-7. I got the spar flanges cut back according to the plans and then created bend reliefs so I can bend the tabs appropriately. I used my flies to create these reliefs, but the plans say to use a drill and then files. It probably would've been easier had I used the drill first, but they still turned out pretty well.


Forward spar flanges cut back

Reliefs started... had to make them a bit deeper with my files 

To finish out a productive day, I cut two of the front ribs according to the plans. The aft flanges on these ribs have to be cut to allow them to fit around the reinforcing angles I worked on earlier.


Aft flanges of the ribs cut

This was a really productive day. I hope every weekend day will be this productive, but I know life will get in the way sometimes. I'm already finding myself losing time on the project to doing stuff with my friends. But I'm OK with that... I don't know how long I'll live in California and I want to take advantage of that while I'm here. This all just goes back to my insistence that I not have a set timeline for my project. As long as I'm working consistently on the project, I'll be happy.


Monday, September 2, 2013

Started!

Well, as of tonight, I can officially say I am building an airplane! I got started on the horizontal stabilizer. Most of the work done tonight was on two reinforcing bars that are attached to the rear spar of the horizontal stabilizer. I had to round off the edges of the reinforcing bars and match drill them to the rear spar. I then had to match drill a few brackets to the spar as well. It wasn't a ton of work tonight, but did take a good bit of time. I worked for probably five straight hours.


The reinforcing bars clecoed to the rear spar of the horizontal stabilizer

One of the brackets match-drilled.

The point at which I stopped tonight.

Tomorrow I will continue work on the rear spar and hopefully get started on the forward spar. I'm having fun so far! It still seems surreal to think I am actually doing this, but I am happy with my decision and proud to have started. Hopefully more to come tomorrow...


Tuesday, August 27, 2013

Practice Kit Finished

Well, I finished the practice kit tonight! It turned out OK... actually I'm not too terribly happy with it. But it's the practice kit for a reason, and I didn't expect it to come out perfectly. To finish it tonight, I had to roll the leading edges. It turned out to be a relatively frustrating task, but I got it done. However, they're not that great. It's not really an even, consistent curve on each side. So, I'm glad I learned how difficult it is on this practice kit and I plan to get some help from experienced builders when I get to that point on the actual kit.


The finished product

A side view

One more with the vinyl removed

This was a great opportunity to get some practice. After I finished the leading edges tonight, I used some scrap aluminum to get some more practice flush riveting. It was at this point that I realized a big mistake that I have been making this whole time (good timing right?)... I have been pressing really hard on the metal with the rivet gun and bucking bar. This has made the rivet gun slip around and bang the metal, denting and scratching it up. When I practiced on the scrap, I held the gun and bucking bar with much lighter pressure and let the hammering action of the gun and the weight of the bucking bar form the rivet. It's amazing what the tools themselves will do. The rivets set much easier and the gun doesn't move around nearly as much. This was a big, big realization and I'm looking forward to experimenting some more. I am going to get more practice in before starting the kit, and I think I'll see a huge improvement in my riveting. 

I hope to get some more practice in over the next couple days and then get started on the actual project this weekend, which will be a four-day weekend for me. Getting close!


Tuesday, August 20, 2013

More Work on the Practice Kit

I got back to work on the practice kit tonight after a few nights off. Tonight I back-riveted the stiffeners to the skins. Back-riveting is basically using a chunk of steel that sits on the table as the bucking bar. Normally, the rivet gun would be placed on the "manufactured head" and I would created the "shop head" on the back side. In the case of back-riveting, it's the opposite. The flush head of the rivet is placed on the back-rivet plate and I create the shop head with the rivet gun. It's pretty easy to create some good-looking rivets with this method.


Stiffeners riveted to the skins

After getting the stiffeners riveted in place, I riveted the skeleton together. This just consists of the two ribs and the stiffener plates I prepared a few nights ago. I did these rivets with my pneumatic squeezer and they turned pretty well. I then clecoed the skins to the skeleton and match drilled them. That's about as far as I got tonight.


Shot of the rivets holding the skeleton together

The skins clecoed to the skeleton

Another shot of the skins clecoed to the skeleton

This is where I stopped for the night, but it looks awesome! It's starting to come together and look like an airplane part. The two pieces of aluminum skin extending past the front side of the skeleton will be rolled to create the round leading edge. Tomorrow, I'll try to debur the holes I drilled tonight and get the skins riveted on the skeleton. After that, I'll roll the leading edges and finish up this project. I'm getting excited (and a bit nervous) about starting on the actual airplane!


Monday, August 12, 2013

And More Practice

Last night I worked a little bit on the practice project, preparing the skin stiffeners. These stiffeners serve to provide some more rigidity to the control surface or wing skins, keeping them from flexing too much. They're cut from a piece of formed aluminum angle. You can see two stiffeners sitting in the middle of each skin in the picture below. I also deburred all the edges of each part last night.


All the parts of the practice kit... stiffeners are sitting in the middle of the skins

Tonight, I dimpled the stiffeners and skins to prepare them for the flush-head rivets. Then, I drilled the ribs and spar doubler plates to the spar. The spar is the main source of strength in the control surface or wing. The doubler plate just serves to add some strength to the spar where the ribs are attached. I deburred all of the holes and then clecoed them together. I now have my first airplane-looking part... AWESOME! From here, I will work to match-drill the skins to the ribs. After that, I may get some additional practice spraying primer on these parts. After that, I will rivet the assembly together.


The parts all sitting in their place for the night

My first assembly representing part of an airplane!

I put in about an hour and a half tonight. I am guessing this will be pretty standard for work during the week. I have a bit of a drive each day, so by the time I get home, have some dinner and unwind a bit, I'll only have about three hours tops. My goal is just to do a little bit each night, which will allow me to get my much-needed sleep and keep the project moving along. Weekends and holidays will be my days of big progress.

I am really starting to realize why building these airplanes takes so long. ha! There are so many little steps that go into preparing each assembly. Deburring is a simple but important task that ends up taking a serious chunk of time. I'll be happy as long as I can consistently work on the airplane. I know it's going to take a lot of time to finish. Looking forward to putting more work in tomorrow night!

Saturday, August 10, 2013

More Practice

I've been busy this last week with attending my cousin's wedding in Denver and enjoying California with my brothers and sister. We had a great time together, but I'm excited to get back to working on the project.

I got into my second practice kit tonight, starting with a simple riveting project. I had to prepare two aluminum sheets and a piece of aluminum angle by drilling the holes and deburring everything. Then I riveted it all together, using universal rivets, flush rivets, and pop rivets. It wasn't a very complicated project, but I gave me some more practice that I still very much need.


Close up of tonight's project

The project sitting on my rolling workbench

There are a few things I want to discuss with the local builders. For example, when I riveted the two sheets of aluminum together, there was some distortion in the metal (one of the sheets is not straight when you look down the edge). I want to ask them if this might be a result of my riveting progression (I didn't go down the line but sort of bounced around between rivets). But overall the project turned out OK. I'm getting a much better feel for my tools and how exactly to use them all.

Tomorrow I will start on the small control surface portion of the practice kit (you can see the parts sitting in the top right of the second picture in this post). Looking forward to seeing something that looks like an airplane part come together!