Tuesday, August 27, 2013

Practice Kit Finished

Well, I finished the practice kit tonight! It turned out OK... actually I'm not too terribly happy with it. But it's the practice kit for a reason, and I didn't expect it to come out perfectly. To finish it tonight, I had to roll the leading edges. It turned out to be a relatively frustrating task, but I got it done. However, they're not that great. It's not really an even, consistent curve on each side. So, I'm glad I learned how difficult it is on this practice kit and I plan to get some help from experienced builders when I get to that point on the actual kit.


The finished product

A side view

One more with the vinyl removed

This was a great opportunity to get some practice. After I finished the leading edges tonight, I used some scrap aluminum to get some more practice flush riveting. It was at this point that I realized a big mistake that I have been making this whole time (good timing right?)... I have been pressing really hard on the metal with the rivet gun and bucking bar. This has made the rivet gun slip around and bang the metal, denting and scratching it up. When I practiced on the scrap, I held the gun and bucking bar with much lighter pressure and let the hammering action of the gun and the weight of the bucking bar form the rivet. It's amazing what the tools themselves will do. The rivets set much easier and the gun doesn't move around nearly as much. This was a big, big realization and I'm looking forward to experimenting some more. I am going to get more practice in before starting the kit, and I think I'll see a huge improvement in my riveting. 

I hope to get some more practice in over the next couple days and then get started on the actual project this weekend, which will be a four-day weekend for me. Getting close!


Tuesday, August 20, 2013

More Work on the Practice Kit

I got back to work on the practice kit tonight after a few nights off. Tonight I back-riveted the stiffeners to the skins. Back-riveting is basically using a chunk of steel that sits on the table as the bucking bar. Normally, the rivet gun would be placed on the "manufactured head" and I would created the "shop head" on the back side. In the case of back-riveting, it's the opposite. The flush head of the rivet is placed on the back-rivet plate and I create the shop head with the rivet gun. It's pretty easy to create some good-looking rivets with this method.


Stiffeners riveted to the skins

After getting the stiffeners riveted in place, I riveted the skeleton together. This just consists of the two ribs and the stiffener plates I prepared a few nights ago. I did these rivets with my pneumatic squeezer and they turned pretty well. I then clecoed the skins to the skeleton and match drilled them. That's about as far as I got tonight.


Shot of the rivets holding the skeleton together

The skins clecoed to the skeleton

Another shot of the skins clecoed to the skeleton

This is where I stopped for the night, but it looks awesome! It's starting to come together and look like an airplane part. The two pieces of aluminum skin extending past the front side of the skeleton will be rolled to create the round leading edge. Tomorrow, I'll try to debur the holes I drilled tonight and get the skins riveted on the skeleton. After that, I'll roll the leading edges and finish up this project. I'm getting excited (and a bit nervous) about starting on the actual airplane!


Monday, August 12, 2013

And More Practice

Last night I worked a little bit on the practice project, preparing the skin stiffeners. These stiffeners serve to provide some more rigidity to the control surface or wing skins, keeping them from flexing too much. They're cut from a piece of formed aluminum angle. You can see two stiffeners sitting in the middle of each skin in the picture below. I also deburred all the edges of each part last night.


All the parts of the practice kit... stiffeners are sitting in the middle of the skins

Tonight, I dimpled the stiffeners and skins to prepare them for the flush-head rivets. Then, I drilled the ribs and spar doubler plates to the spar. The spar is the main source of strength in the control surface or wing. The doubler plate just serves to add some strength to the spar where the ribs are attached. I deburred all of the holes and then clecoed them together. I now have my first airplane-looking part... AWESOME! From here, I will work to match-drill the skins to the ribs. After that, I may get some additional practice spraying primer on these parts. After that, I will rivet the assembly together.


The parts all sitting in their place for the night

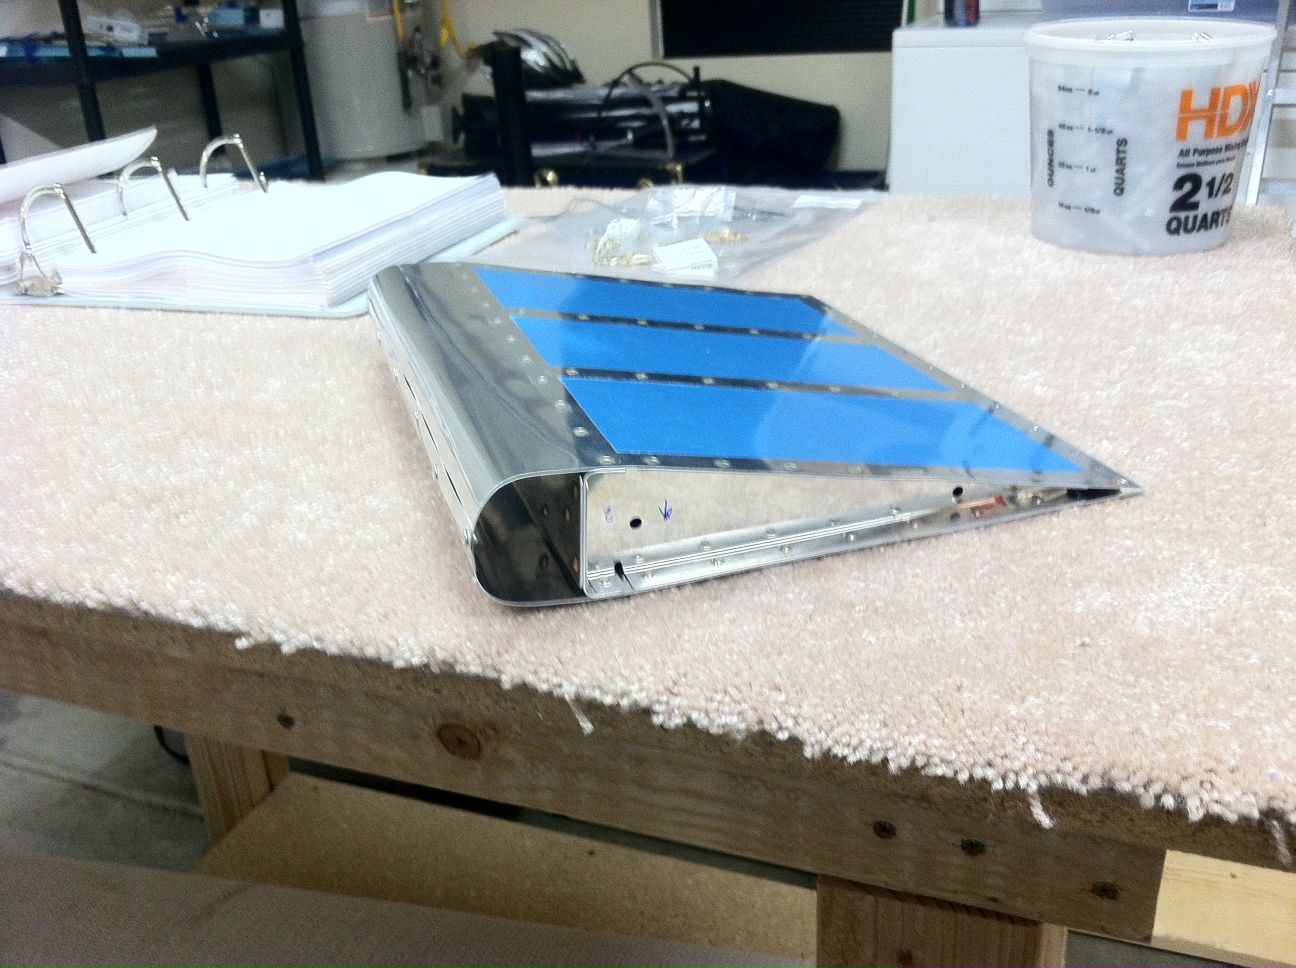
My first assembly representing part of an airplane!

I put in about an hour and a half tonight. I am guessing this will be pretty standard for work during the week. I have a bit of a drive each day, so by the time I get home, have some dinner and unwind a bit, I'll only have about three hours tops. My goal is just to do a little bit each night, which will allow me to get my much-needed sleep and keep the project moving along. Weekends and holidays will be my days of big progress.

I am really starting to realize why building these airplanes takes so long. ha! There are so many little steps that go into preparing each assembly. Deburring is a simple but important task that ends up taking a serious chunk of time. I'll be happy as long as I can consistently work on the airplane. I know it's going to take a lot of time to finish. Looking forward to putting more work in tomorrow night!

Saturday, August 10, 2013

More Practice

I've been busy this last week with attending my cousin's wedding in Denver and enjoying California with my brothers and sister. We had a great time together, but I'm excited to get back to working on the project.

I got into my second practice kit tonight, starting with a simple riveting project. I had to prepare two aluminum sheets and a piece of aluminum angle by drilling the holes and deburring everything. Then I riveted it all together, using universal rivets, flush rivets, and pop rivets. It wasn't a very complicated project, but I gave me some more practice that I still very much need.


Close up of tonight's project

The project sitting on my rolling workbench

There are a few things I want to discuss with the local builders. For example, when I riveted the two sheets of aluminum together, there was some distortion in the metal (one of the sheets is not straight when you look down the edge). I want to ask them if this might be a result of my riveting progression (I didn't go down the line but sort of bounced around between rivets). But overall the project turned out OK. I'm getting a much better feel for my tools and how exactly to use them all.

Tomorrow I will start on the small control surface portion of the practice kit (you can see the parts sitting in the top right of the second picture in this post). Looking forward to seeing something that looks like an airplane part come together!